How to do inspections


This article explains how do to inspections of your equipment and is designed to be used in conjunction with these articles:
- Inspections in Circus Rigging which goes into the regulatory background, and
- Recording Inspections which explains which forms to use and what you’re required to record.
These videos will show you how to go about each process:
The How to do Inspections video is particularly good to view alongside this article. Industry expert Chris Higgs, from Total Solutions, walks us through the procedure for inspections with a few example items. This shows you in detail the markings on some examples of equipment, how to go about the process of a visual and tactile inspection on them, and some signs that the product may fail.
It’s not a comprehensive guide for every piece of circus rigging kit, but you can apply the same principles to your items.
Introduction
There are two types of equipment checks: a “thorough examination” and an “inspection”. The first is associated with the Lifting Operations and Lifting Equipment Regulations 1998 (LOLER 1998) and the second is associated with the Provision and Use of Work Equipment Regulations 1998 (PUWER 1998).
The requirements for who carries out the inspection/thorough examination, and how it is recorded, are more stringent under LOLER than PUWER (see Recording Inspections article). However, the visual and tactile procedure of checking equipment for potential faults, flaws, wear and tear is the same in both cases.
Here, we look at how that process is applied to some items that are commonly found in the circus world, and how to make sense of the markings on them. This will help when it comes to identifying individual objects and what you need to record.
It takes a while to be thorough, so give yourself time to do it properly, and find somewhere comfortable to avoid getting tired.
You might want to have a magnifying glass to hand because the writing on smaller items is obviously less visible. Note that the legibility can only be harder based on size, if it’s damaged it has to be retired. You can also rub a piece of chalk over the writing so that it leaps more easily out at you.
It may seem laborious, but it’s the only way to be sure. If you haven’t found any damage, you can record the inspection on your register, saying it’s passed your test, and put it back in its place.
Slings
Anything that is used as lifting equipment must have a readable CE mark, Working Load Limit (WLL) or Safe Working Load (SWL) and serial number.
Slings are not necessarily lifting equipment but they are in the work environment and that means they should have at least a CE mark (or UKCA mark, when the post-Brexit changes come into force).
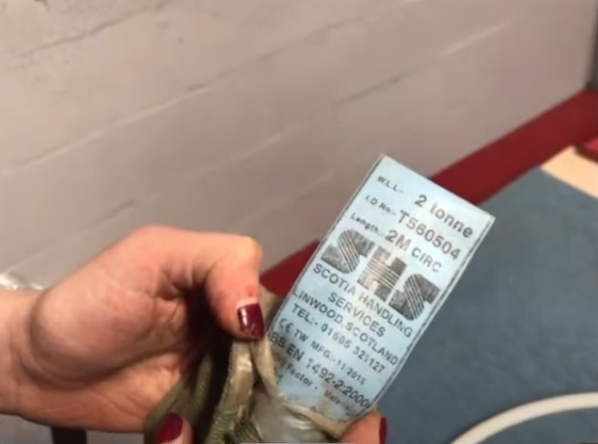
Example Information on the label:
- SHS – stands for Scotia Handling Services, the manufacturer
- T560504 – serial number
- CE mark
- Scotia Handling Services phone number
- WLL of 2 tons
- Safety factor of 7:1
- 2m – length. It’s unlikely that it would get so badly stretched that you couldn’t tell what length it should be. A green sheath indicates a 2-ton WLL, purple would be 1 ton, yellow would be 3 ton, but in the entertainment industry we use a lot of black, so always go off what’s on the label. There’s a phone number there so if you have questions, you can call the manufacturer. Sometimes it will be marked “EWL = 1” and that is half a circumference so it’s a 2m sling. This has caused huge confusion over the years.
- On the reverse side of the label: graphics of different load factors according to how you rig it in various ways. It’s a requirement that you can read the numbers clearly, so if they aren’t legible, you should retire it.
Inspection method:
- Find a fixed point to work from, usually the join between the two ends (where the label is), to begin your visual and tactile inspection around one side of the sheath.
- Check the stitching at the join – it only holds the two sides of the sheath together so it’s not the end of the world if you have some loose threads, but it would be an indication that it’s on its way out.
- The lump close to the join is almost certainly the end of the tube that goes inside to make a bodkin. If you found that lump away from the join, that would be something to be concerned about. Sometimes you find two smaller versions where they’ve taped the ends of the coil of yarn to itself.
- As you run your hands along the sling, you’re looking for heat damage or cuts to the sheath, or powdery deposits which might indicate chemical damage (unlikely but not impossible).
- Cuts could mean that the load-bearing white yarn inside has been exposed and damaged, so then you’re looking for the white strands inside, and checking if you can pull any out. If you can see the core, it’s no longer protected by its covering so the risk of damage and failure is increased and it should be retired.
- When you’ve gone all the way round so that you’re back at the label, turn the sling 180 degrees so that you can do the same on the inside.
The lifespan of a sling
Chris says: “Some manufacturers recommend retiring slings after seven years. That’s around UV degradation. Some types of sling are more heat sensitive than others.
“In a round sling, UV degradation not an issue. One of the largest manufacturers told me around 15 years ago they’ve got no experience of UV damage penetrating through the sheath to the load-bearing yarn. A webbing sling for harnesses etc, or a lighter weight anchor sling, would be different because then the webbing is the load-bearing material and that’s what the UV hits, so it could degrade.
“Risk management wise, just get rid if there’s any doubt, it really isn’t worth it.”
Karabiner
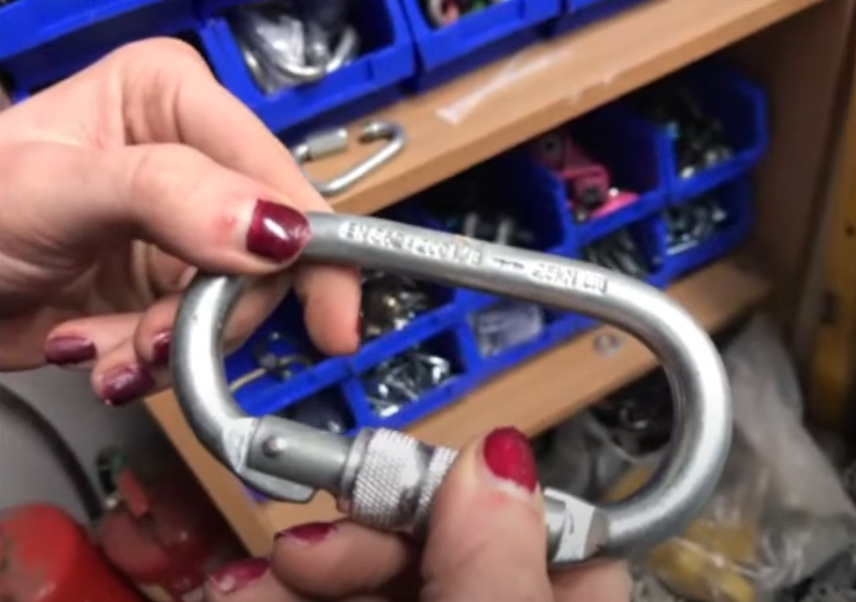
Example Information markings:
- The CE mark followed by four numbers 0082 identifies the manufacturer.
- The mark “EN 362:2004 /B” is NOT serial number. The EN 362 part shows the manufacturing standard required for connectors used in a fall arrest system. The year of manufacture was 2004, and B indicates the type of connector. So this was made to a standard that was applicable in 2004, and it’s worth bearing in mind that standards may have changed for some items so you may want to discard older ones.
- The arrow indicates the force being applied on the long axis.
- 25kn indicates the breaking load in that direction. So if you clip that between two carthorses and pull apart, when it reached 2.5 tons there’s a strong chance it will reach the point at which it can’t sustain the force.
- The little logo stamp (a book with an ‘i’) indicates that there is a manual or at least instructions for safe use. However, there’s nothing here to show who made it so you’d rely on your record of purchase if you wanted to check the manufacturer’s manual.
- COO82 is the notified body for quality assurance. This is a body appointed by en EU nation member state to ensure that the product, if it’s manufactured as PPE meets, the required standard. Post-Brexit it’s the authorised body in the UK. If you want to put PPE on market, you have to use a third party to check it meets requirements of the relevant directive and that quality assurance is in place. They take it to their lab and break it to make sure it still does the job it’s made for. In the UK it will be UKCA then the four numbers.
- Serial number or identifying marking
Inspection method:
- Does it look symmetrical? Hold it up to see if there is any twisting. Lay it on a flat surface to see if there is any rocking.
- Are there any obvious sharp edges where the item has been damaged? Sharp edges will cut slings.
- Snap the gate open and shut. Does it feel stiff the further back you go, does it snap back nicely? This tells you about the condition of the spring that does the closing action.
- Screw it up closed and try to open the gate. In an old carabiner, the material can be thin and you can get chips which allow the gate to still open. This would mean it’s time to discard it.
- Look at the pins from the inside looking out and outside looking in. Look for debris, and if you find any, clean it with paintbrush or wire brush. If you can’t see the metal because it’s under debris, you can’t inspect it. Check if it’s dust or bits of karabiner. Oil will attract debris.
- Is there any play in the gate?
- Look for cracks around the edge of the pins, check if the pins are bent, if they stick out either side, and if there’s any untoward movement. You don’t want a wobbly hinge.
- Hold the latch open and screw the screw off – now you can see to inspect what’s under there. At this point, you can give it spindle oil, or whatever the manufacturer recommends.
- Run your thumbnail around the inside of the loop, you’ll feel any defects catching your nail more than on your fingertips.
- Do the same to either side, on the outside edges.
- There might be paint, you could use Scotchbrite sponge to wipe it – not an emery cloth which might damage the surface.
- Where the spring doesn’t pop back, it won’t affect load but it is discard criteria.
Once you get to know each of your products you know exactly where to look for. For instance, if you go to the Petzl website, it says that if there’s a groove more than 1mm then it’s a discard because it could be sharp. So you must look at manufacturer’s recommendations.
Bow shackle
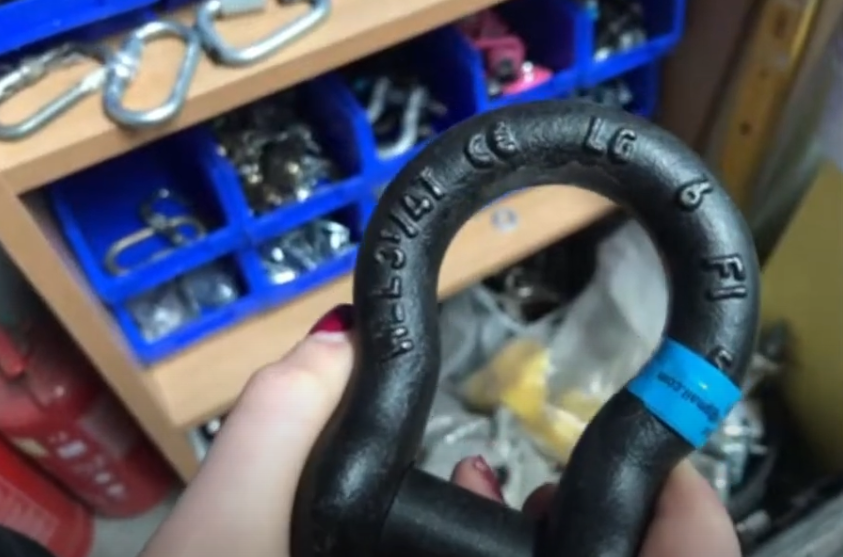
Example Information markings:
- Blue label says it did belong to someone else who sold it on. To inspect the shackle, you’d need to move that label.
- LG – manufacturer, possibly Lifting Gear in Manchester
- WLL 3.25 ton
- CE mark
- 6 – made from Grade 6 material
- F1 – possibly the batch number
- 5/8 – the diameter in inches
- On the head of the pin, it says QF3-6 – probably batch number and grade 6 material
- On the back of the pin there is a mark – you need to check that with manufacturer, or ask the person who sold it to you, or check the paperwork they supplied.
Inspection method:
- Is it deformed in any way? A quick way to tell is to take the pin out – if that comes out easily and there no binding on the thread, there’s a good chance it’s not been twisted in the plane that the pin was in.
- Hold it up to check for twisting, lay it against a flat surface to check for rocking.
- Do the thumbnail trick all over both sides. You’ll feel it before you see it.
- Check the pin hasn’t got a groove worn in it, that can happen.
- Put the pin in the wrong side. If you encounter a sticky thread, put it all the way in, if it flies in with ease, you’ll know there is no problem with the thread. If you’d unscrewed it and encountered some tightness, you could imagine it was the thread, but you’ve just proved that it isn’t the thread. If it had been stiff taking it out, it would indicate there was a strong possibility that the body of the shackle was bent/deformed in some way, so that it prevented the pin moving into the thread correctly. On a bow shackle, one side is threaded, the other has quite a big hole in comparison. This is to allow a bit of movement, because when you put 3.25 tons on it, the whole thing will shift around and you don’t want it to bind. The pin isn’t a bolt, it works like a beam, supporting each side.
- A fibre rope or round sling may take the paint off. If it offends you aesthetically, don’t paint it. If you do, you could be papering over the cracks.
Pulley
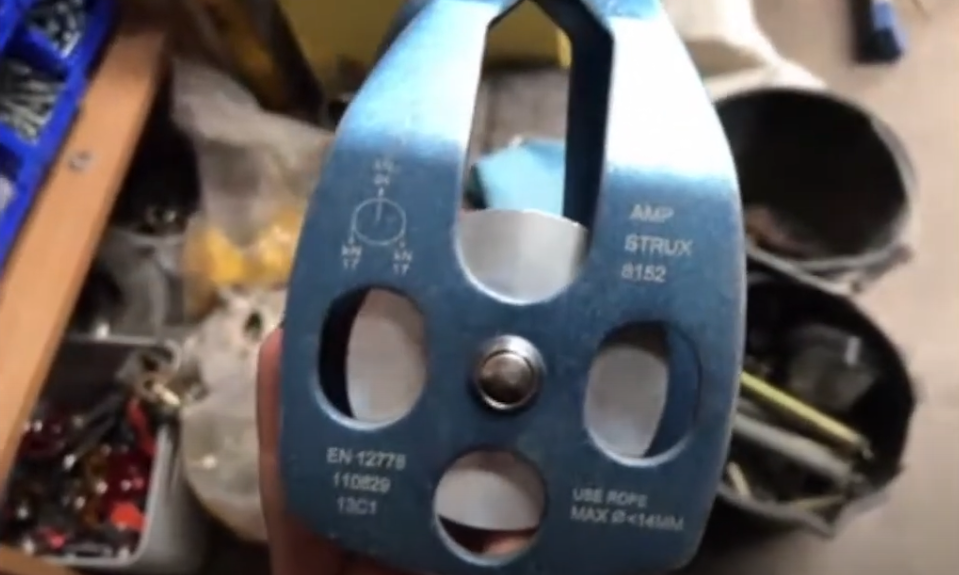
Example Information markings:
- Amp Strux – manufacturer. Sometimes there’s nothing, so if you haven’t bought it, you can’t tell.
- EN 12778 – it meets an EN manufacturing standard, possibly for rescue carabiners
- Use rope max ø< 14mm – gives you rope size, which is useful, it’s machined for less than 14mm.
- Load info in a diagram stating 17kn – given the values, it’s a Breaking Load not Working Load Limit, so it’s designed to lift less than that. It should really say that.
- Piece of tape – information might be hidden under that, or it can obscure defects.
Inspection method
- Think about how a pulley is used. It will be hung up from the top, so where is the strain going to be seen? At the top, so apply the thumbnail inspection test there.
- The anodising is chipped away, so look to see if any metal material has been chipped away. Sharp edges could easily cut slings.
- Check the shaft on the pulley wheel (shiv) for any play/wobble. If you find any, compare one pulley against another to see what’s normal.
- A little torch or inspection lamp is useful to look inside, you want to see if there are there any iron filings or debris. We have no idea if there is a bearing in there.
- Clip the pulley to a carabiner to hold it up, then use your finger to get inside the pulley and see if there is wiggle in the internal parts. If there is, that’s excessive wear and tear and they pulley needs to be discarded. If you used a D-carabiner instead of an oval, it would pull and it could be a real problem, it would cause it to wear as you put load on the rope and could cause damage really quickly with high revolution.
- Be careful what you use to take stickiness off if you remove tape, you don’t know what it will do to the material – not so much metal but ropes.
- The cheeks of the pulley are angled so that they sit together in the carabiner, so it’s useful to measure that gap when you buy a new one, and make that part of your inspection process to check for changes.
Trapeze
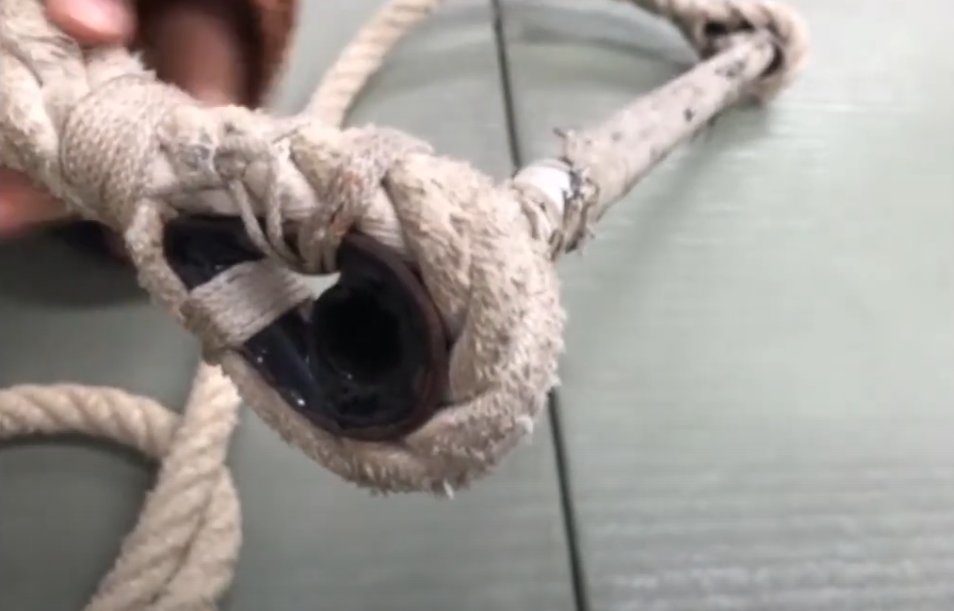
Information markings:
None
Inspection method:
- Check the rope all the way round the eye of the maillon. Because we know this has been made with care by Firetoys, the thimble probably got put through the maillon before the splice was made. Imagine trying to get the maillon on to the eyelet with the rope there, the gate isn’t big enough, you’d get cuts in the rope.
- Check the maillon and shackles the same as a carabiner, looking for defects and using your thumbnail. There are two carabiners so you can lie them side by side and any damage will be glaring.
- Check to see if the whipping is intact.
- Cotton rope doesn’t like impact. Look closely where it’s been stretched and has metal under it, think about it being dropped and damaged. The parts where the cotton meets the metal may not last long. Work along the rope looking for the obvious, cuts etc. Normally with cotton rope, if you see loose ends then I would worry because under load, it will fray open.
- Halfway up the rope, twist it with both hands to open it just a bit, and sniff. If it smells like old socks, it’s rotten.
- There’s a bit of furring, but it’s not one particular area so unless it starts to behave peculiarly with one side not behaving the same as the other, it’s not a concern.
- If you see any loose ends or frays, that would be a concern.
- If you know who made your trapeze, ask for detail about how the rope joins the thimble on to the bar – if it’s welded, you need to see the weld because you can put a lot of leverage on there. Any doubt at all, have a word with them.
- If it’s made from natural fibre, make sure it’s stored dry.
- If there’s anything that looks unusual, and you don’t know if it’s ok, then it’s beyond your competence. You should do the inspection with someone else who can advise.
Manufactured kit without paperwork
There are people in the circus world who make their own props, and sometimes sell them on. This can work out well or can be dangerous if you don’t know what to look out for.
Chris Higgs advises: “When you get it, measure it before you use, then use it in a controlled way, then measure it again.
“If you know who sold it to you, you can phone them. They might have experience of certain failures, and have useful information about them. They will have used some standard to manufacture it, so they can help you to understand it so that you can continue to use it safely.”
You need to understand how it’s been manufactured, what some of the pitfalls are and where to get replacement parts, so that you can keep it going. You need to know if you try to copy things, if it could do more harm than good.
Sharp edges are important. You should keep an eye on anywhere that you have movement of one part against another, to see if it produces a residue, indicating wear.
Summary
Apply same principles of visual and tactile inspection to all equipment, and use common sense.
If there’s a risk in using it, then don’t. If you’re using it, be happy with its condition, don’t trust to luck. There’s usually someone you can ask.
If you condemn something, make sure no one will take it out of the skip or bin – make it impossible for it to be used again by cutting it up, for instance, and make sure that wildlife can’t be harmed if they get at it.
In partnership with Articulation
Funded by Creative Scotland