Setting up a safe rigging point at home


Contents:
- Introduction
- How strong does your rigging point need to be
- Is your building strong enough?
- What kind of equipment do you need?
- Is it done correctly
- How to get the best from your structural engineer
Introduction
This document looks at the setting up of safe rigging points for static aerial equipment. We will cover the different types of rigging methods that can be used at home and how to set them up.
There are many ways to rig; we’ll look at the pros and cons. Installing a rigging point will require some knowledge of the forces that will be put on it, as well as whether the structure can take that load.
Skipping these steps could result in you falling and injuring yourself, or even the people in the room above falling on top of you. It’s not worth the risk especially considering the cost of these consultations won’t be prohibitive and will certainly be less than repair and liability costs.
As we are looking at home-based solutions we will only look at suspending the equipment from a fixed point and will not include pulley systems or other more complex forms of rigging.
How strong does your rigging point need to be?
Probably stronger than you think when you eyeball it. Aerial arts can generate much greater forces than you might imagine even with relatively gentle movements, so it’s not like screwing a pull-up bar into a door frame. You need a calculation of the Working Load Limit (WLL). It’s generally given in kilos – for instance the WLL could be 600kg, meaning that 600kg of force is the maximum that could be generated by the proposed use.
At the moment there’s no simplified table for you to check to get the WLL, but that is a work in progress among the members of this group. Forces are being measured with a device called a load cell in all sorts of situations using all sorts of equipment to provide a mass of data which could potentially be collated and turned into a chart that could act as a reference guide.
Until that reference guide exists, you’ll need to consult a rigger. It’s possible that a simple phone call to describe your intended use could give you the WLL – riggers don’t need to see the building, they just need to know what the rigging point will be used for.
The calculation for the forces will depend on the weight of the performer or performers, the type of equipment, the level of expertise, the height of the rigging point and the types of moves that will be practised.
The rigger will probably ask questions about the future because the load will change as you improve – bigger tricks mean bigger loads. And unless you’re supervising children in the house 100% of the time, you can pretty much guarantee that their pals will climb on, maybe more than one at a time. Getting close to the WLL over time will weaken the point.
Ideally for performers, a rigger would use a load cell to accurately measure the forces in their act, and then they can also give a technical document to any venue where they perform to ensure that the rigging point is strong enough.
If you don’t know a rigger, get in touch with us and we’ll try to connect you with someone who’s a circus expert – working at height riggers are generally used to hanging static heavy equipment rather than calculate dynamic forces.
Is your building strong enough?
You won’t know if your building is strong enough to take the WLL without consulting a structural engineer. There’s no way round it. You simply can’t look at a ceiling and know if the aerial equipment will fall down when someone is upside down on it.
You might be lucky and have a beam that the engineer declares can easily take the loads that the rigger has calculated you need. If your beam is visible and you can wrap a sling around it, you’re good to go.
If your building set-up isn’t strong enough, it’s usually possible to reinforce it, and your engineer will advise what you need to do. Using a beam again as an example, the strength can depend on the type of wood, the age of it, the distance between them, and even whether knots are missing which weaken them, plus a myriad of other possibilities. Your engineer may advise adding a metal beam to reinforce the one you want to rig on, or place a metal rigging plate across several of them to spread the load.
The cost of adaptations could be low, or it could be thousands – whichever it is, stick rigidly to the advice you are given.
Your structural engineer will use the Working Load Limit and their assessment of your building to calculate another figure – the Factor of Safety (FOS). This adds a margin to the kilogramme rating to take into account the material that your proposed rigging point will be set up on, and how it might degenerate over time when it’s subject to repeated impacts up to the WLL.
You’ll need a completion certificate/report for insurance or in order to sell the property in future. If you do the work yourself, your engineer may inspect the work and issue the certificate. If you hire a building contractor, they may be able to give you the paperwork too.
What kind of equipment do you need?
There are many different ways to set up rigging points, the following are examples.
All of the rigging equipment you plan to use should be rated for the load which it is going to be used for. The WLL or Safe Working Load (SWL) will be marked on it and it must have a CE marking so you can be sure it has been manufactured to the right standard.
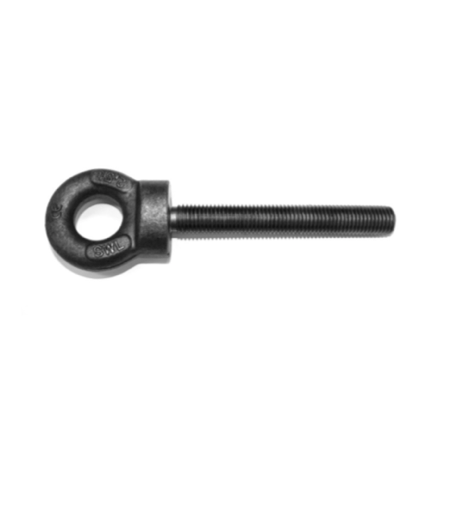
Eyebolts
Eyebolts are commonly installed in concrete walls, floors or ceilings using chemical or mechanical fixings.
By now it should be obvious that it’s important to make sure that it is being installed into a structure that can take the load. All installations should be undertaken by a trained expert.
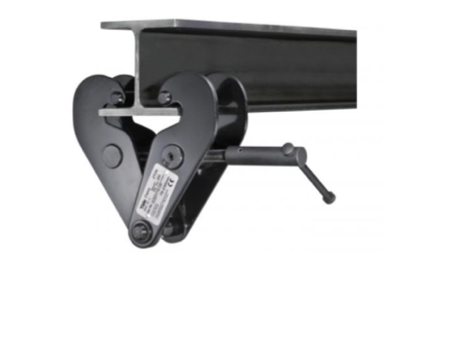
I-Beam Clamps
If you have exposed steel I-beams that can support the forces you will be applying, or if you can install one, then an I-beam clamp will make a secure rigging point.
Again, you will need something that is rated to the right WLL, that is CE marked and has been properly installed. The smallest error in installation could have catastrophic results.
Roof Beams and Round Slings
If you have an accessible roof beam that has been proven to be strong enough, you can use a round sling and a bow shackle to make the rigging point. This is probably the least expensive method. The same points apply when considering what equipment to use.
Free-standing Aerial Rig
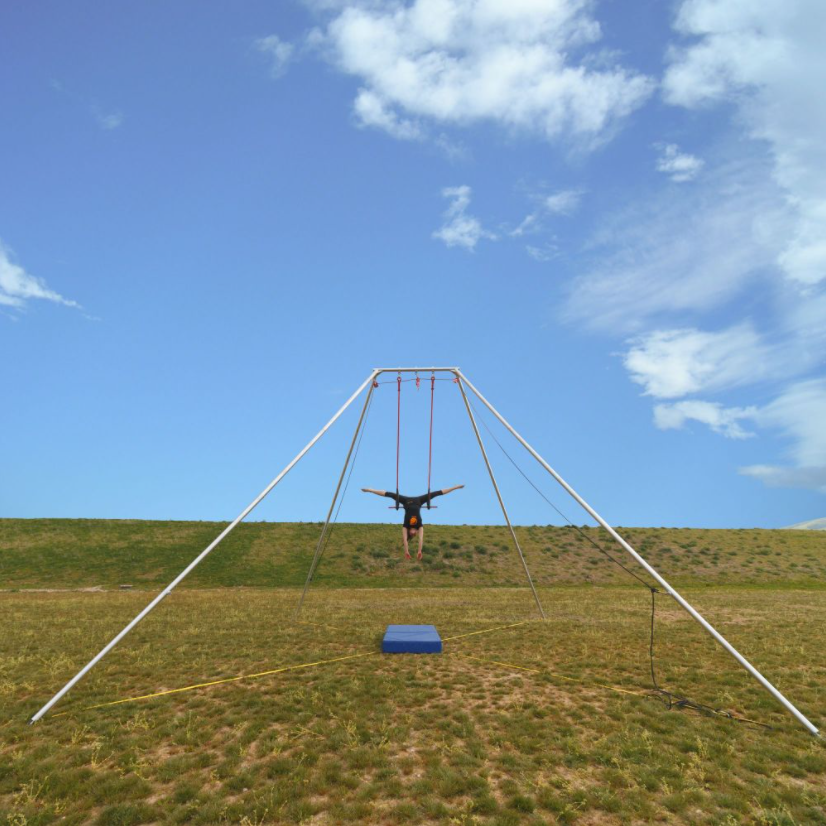
If installing your own rigging point turns out to be too expensive and time consuming, the option of buying something ready-made may be the simplest solution. The rigging point on a frame like this should come pre-rated with a WLL. You will then just need to make sure your activities fall inside the limitation of the rig that you buy – ask a rigger about this. Aerial rigs if you have the space for them will certainly simplify the installation part of the equation, however many of the legal and liability issues remain if anyone gets injured on it.
Ensure you buy a rig from a reputable manufacturer. Many rigs allow very low WLLs and may not be sufficient for your needs.
Tree rigging
This is not something we would recommend because poor tree rigging can be dangerous and can kill the tree. It is possible but really should only be done with a trained expert in tree rigging. You will need to consult both a circus rigger and an arborist if you want to go this route. The forces applied by aerial are far higher than that of a rope swing.
Is it done correctly?
Let’s look at some bad examples of rigging.
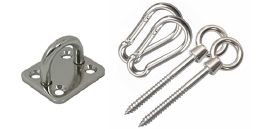
Hardware store equipment
Most equipment available from hardware stores are NOT suitable to be used for setting up your rigging point. The following items are commonly available but don’t meet our criteria. All equipment should have the following:
● CE mark
● WLL mark
● Purpose designed for supporting people
These plates and eyebolts are commonly used to screw directly into wood and if you do so you are likely to weaken the beam you are screwing it into rather than creating a strong rigging point.
Creating your own rig
Creating your own rig out of wood or scaffolding is a risky proposition unless you have the knowledge to calculate the working load limits for your structure and to manufacture it to withstand those. Scaffolding isn’t designed for this purpose.
Things to bear in mind
You may have created the perfect rigging point for your purposes, however are you sure that it won’t end up being used by more people than you intended, especially if they use it at the same time?
If you have installed the rigging point in the downstairs ceiling, if you end up holding a party upstairs while someone is practising it is very likely you will exceed the safe working load of the floor.
Remember that neither the rigger nor the engineer will take account of factors in the first of these rigging at home documents, such as whether there’s clearance to perform the tricks without damaging people or items. These aspects are down to you.
How to get the best from your engineer
Now that you’ve read about the equipment that might be used and the types of rigging points that could be considered, you will be able to speak at least some of the language of the engineer.
Each country and region has their own legislation/regulations on buildings and construction. Many home insurance policies rely on you staying on the right side of those regulations.
You may want to choose a local structural engineer or architect so that they are familiar with the building regs for your area. Many of these professionals understand forces and materials but not acrobatics so it’s a good idea to show them a video of what you’re intending to happen on your rigging point.
Draw up a diagram of what you would like installed from the rigging point, your trapeze or hoop rigging for example, and if you have a good understanding of the rigging point you would like created, then include a diagram of that too.