Circus rigging from truss

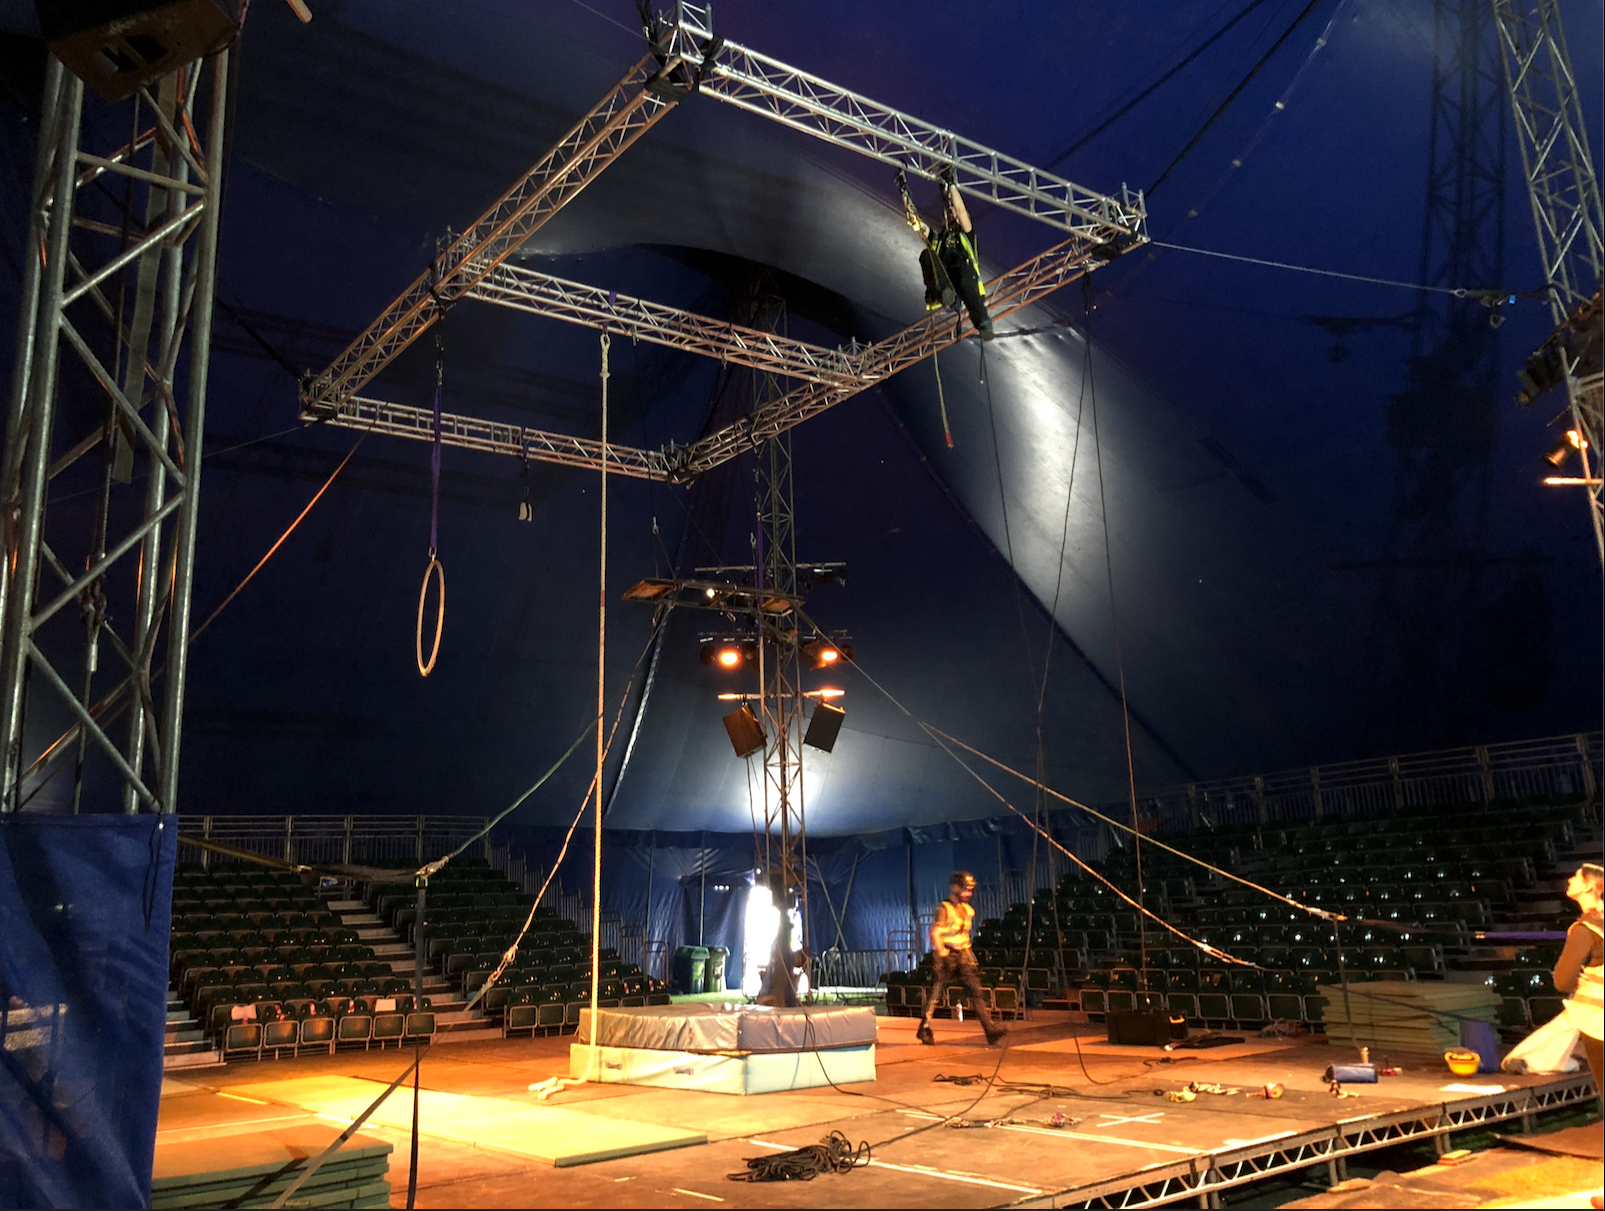
This article discusses how to suspend circus equipment from box truss.
Update: We have a video we created on the topic
For circus rigging, we use equipment from many different sources – most commonly the lifting industry, rope access, scaffolding, and sailing equipment. All are governed by different rules and manufacturing guidelines, and we must take this into account depending on how we are using this equipment for circus applications.
With regards to truss, any reputable brand of truss will be supplied with an operating manual or user instructions available online.
The manufacturer’s instructions are effectively a legal requirement when it is used at work. Regulations stipulate we follow the information and guidance provided by the manufacturer of work equipment.
What you will learn about in this article
- Box Truss
- Slings/connectors
- How they interact
The anatomy of truss

We can build an infinite number of different shaped structures using box truss. The most common in use in circus consists of horizontal sections to rig from and vertical sections to build the required height, to secure rigging, and paging systems, to use as counterweight ladders and for access.
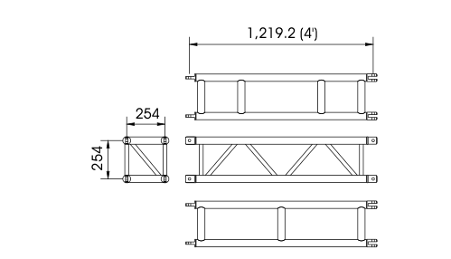
Imagine a section of truss lying horizontally. Then these are the names of the body parts:
- Main chords - the thicker, horizontal tubes running the length of the truss
- Rungs - the thick tubes joining the cords together at regular intervals, like rungs of a ladder
- Braces or diagonal chords - the thinner, diagonal tubes that criss-cross the cords
- Nodes - the part where two diagonal braces join the cord
Truss basics
All trusses are not created equal – even when they look the same. Some manufacturers make different versions for different applications that may look similar yet one may support just half of the weight of the other.
The right truss for you depends on what you’re using it for, and there are several factors to consider. How many rigging points do you want to create and where they will be placed, and the forces that will be applied to each point. The equipment that you use to rig them and how you’ve rigged the points also have an impact on whether the truss can safely take the load. Bear in mind that the truss will have been designed primarily to support lighting or similar production equipment and not an ‘acrobatic load’.
Most modern trusses will allow you to rig from either the top or bottom chords of a horizontal truss. The four horizontal loadbearing tubes in a square truss or three in a triangular truss.
Do not rig to any other tube unless you have the engineering competence to determine the tube is strong enough.
There are some terminologies you should become familiar with which you will find on a manufacturer’s specification sheet. Let’s start with where you will place the load. The longer the span of the truss, the less load you can apply to it as you can see from the example below.
DEFL stands for deflection, which in engineering terms is the degree to which an element of structure changes shape when a load is applied. In our case, it means how many millimetres you can expect the truss to bend under load. Obviously the longer the span, the greater the deflection.
The table below is an example only – do not use these figures for your truss.

- UDL stands for Uniformly Distributed Load, describing how the weight or load is distributed along the truss. This would be where you are suspending something like a speaker panel or large monitor which would be suspended from multiple points along the whole length of the truss.
- CPL stands for Centre Point Load. This would be a single rigging point in the centre of the truss.
- TPL (Third Point Load) which is where we divide the truss into 3 equal sections to place two rigging points
- QPL (Quarter Point Load) we divide the truss in 4 sections to equally place 3 rigging points.
From the table above we can see if we have a 6m length of truss with 1 rigging point in the centre, we can have a max static load of 1166Kgs, two rigging points with a TPL of 874Kgs, and three rigging points with a QPL of 583Kgs.
Manufacturers will assume that you will load the sling evenly on either side of the truss to keep the loads on either truss ‘ladder’ even. On lightweight trusses, this is particularly important to prevent twisting the truss.
One manufacturer quotes a reduction of 40% if a load is hung on one chord/ladder.
If you need a refresher on forces, including Working Load Limits (WLL) and Minimum Breaking Loads (MBL) – see our article here and our Livestream here
Sling basics
There are various types of slings that we can use for rigging circus equipment, which we can divide into two categories: lifting slings and climbing slings.
Slings that are designed for lifting operations have their working load limits written on their label e.g. 1 tonne, two tonnes and usually a factor of safety of 7:1 and a CE or UKCA mark along with a pictorial guide to sling configurations and how that affects the WLL.
Slings designed to be used as personal protective equipment or for rope access, otherwise known as climbing slings, have their Minimum Breaking Load e.g. 22kN written on them with a CE or UKCA mark and usually the relevant EN standard number.
The forces we generate in acrobatic rigging will rarely exceed the weakest configuration the sling can be rigged in. The truss is often not as strong as the sling.
Connector basics
Connectors are a great example of equipment used across different industries and designed for different purposes. These are some of the more commonly used connectors in circus rigging:
- Carabiners – typically used for climbing or as part of Personal Protective Equipment.
- Bow shackles – typically manufactured with lifting operations in mind.
Different regulations for use apply to each of these. See our article on the website here/coming soon.
Carabiners
All of these common types will degrade over time, so regular inspections and replacements are a must.
- Screw gate carabiner – Carabiners come in many shapes and sizes. We will focus on D-shaped or oval carabiners. The D-type distributes the load down the spine of the carabiner and away from the gate. This isn’t necessarily of interest to you as a circus rigger because you will always check the numbers on the side to know the MBL.
- The oval type will often fit better on other items because its symmetrical shape allows the other component to sit freely in the curve. With any screw gate, you want to screw them so that they are securely closed, and it’s generally considered better to have the screw gate pointing down in case of vibrations from usage gradually loosen it. So, always check before using.
- Triple action carabiner – you need to push and twist then open this, so it’s a more secure closure as it can’t be opened accidentally.
- Ball-lock carabiner – A type of triple-action carabiner
- Tamper-proof, like the Petzl Am’D Pin Lock which requires a tool to open.
Carabiners are designed to be used with the line of force carried vertically along the long sides of a D or offset D and on both sides of an oval karabiner. Carabiners are not designed to support 3-way loading, for example when joining slings in a Y configuration to support a vertical load.
Aluminium vs Steel
These are manufactured in both steel and aluminium, and each is useful for different reasons. Extreme loads will deform a steel carabiner before it breaks, so regular inspections can avert disaster. Aluminium won’t deform; it will just break. However, they are often used next to the performer because if they hit them on the head, they cause less damage.
Risk assessment is key; what price safety? It may be safer and more economical to buy 10 steel connectors at £5 each than two alloy ones at £20 each. Always have a spare, so you are not forced to compromise.
Check CE/CA marks for quality
The law that governs manufacturing standards for lifting equipment in the UK is the Supply of Machinery Safety Regulations 2008. This is the EC Machinery Directive implemented in the UK, and pre-Brexit conformity with the Machinery Directive was signified by the ‘CE mark’. In the same way, equipment placed on the market as PPE to protect people from falls from a height must meet CEN standards even post-Brexit. UK Law still aligns with EU law with regard to PPE.
Post-Brexit, the CE mark is not a requirement on products placed on the market as mentioned earlier. The UK now has its own ‘UKCA’ mark instead. At the moment the requirements to achieve the UKCA mark are the same as those required for the CE mark but over time requirements may diverge, as might CEN and UK standards.
We have seen fakes coming in through Amazon and eBay in recent times with questionable quality, which is why we say check that the markings are authentic. How can you check?
The best way is to find a reputable and reliable manufacturer/supplier within the UK who will issue certificates of conformity and user instructions with the products. It’s a legal requirement for lifting and some work equipment; always for fall protection PPE.
You may find them through their own storefronts on Amazon or eBay or at a physical store local to you – climbing equipment stores and PPE or lifting equipment manufacturers can be found all over the world.
Bow shackles
Bow shackles intended for use in lifting are governed by the regulations for lifting equipment. These have the WLL limit marked on them which already takes account of a large safety factor against failure (usually around 6 x marked WLL). For details on load calculations when using these to lift people check out our article on the subject.
We will often use bigger bow shackles than necessary because larger bow shackles have more space for slings or circus equipment, not because we need the load capacity.
Because many of these have a screw pin, there’s a chance that they could come loose. To avoid this, you simply thread a cable tie through the eye of the pin and around one ‘leg’ of the shackle body and pull it tight. Be careful to clip off the excess without leaving a sharp edge. It will create a sharp edge that can easily damage your sling, rope or thumb, or both! (You could simply leave it ‘long’).
Rigging with slings & connectors
When we are using a round sling on a truss, we need to use it in a way that won’t negatively impact the truss, damage it or use it incorrectly
- Place sings over both top or bottom chords to evenly load the truss ‘ladders’ and prevent twisting
- Rig slings next to ‘node’ points (where the verticals or diagonals meet the horizontals) – not through a node in a way that can put pressure on the thinner diagonal bracing tubes which can lead to a local weakness in the truss structure, potentially even total failure under some circumstances.
If you simply place the sling over the truss and use a connector to bring the two ends together underneath, it will spread the load nicely, but it will probably slide around or along the truss when the aerial equipment is in use. There are a few ways to avoid this:
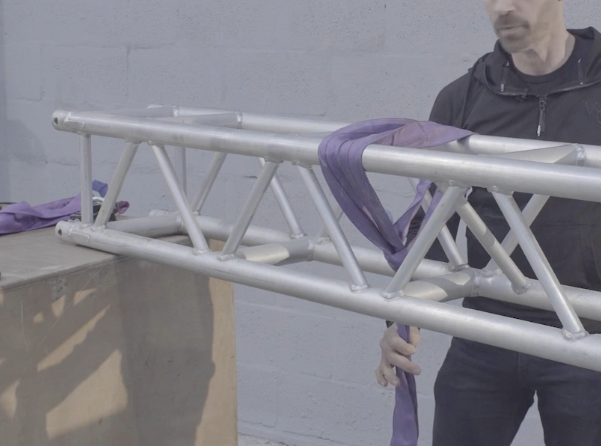
- Choking the sling around one chord on the truss - bring one end of the sling up and through itself so that it tightens down on the chord. This will stop it from moving, but you now have the potential to twist the truss, so you have to be mindful of the forces being applied. It’s not a bad configuration; it’s just that the truss derating factor may need to be considered.
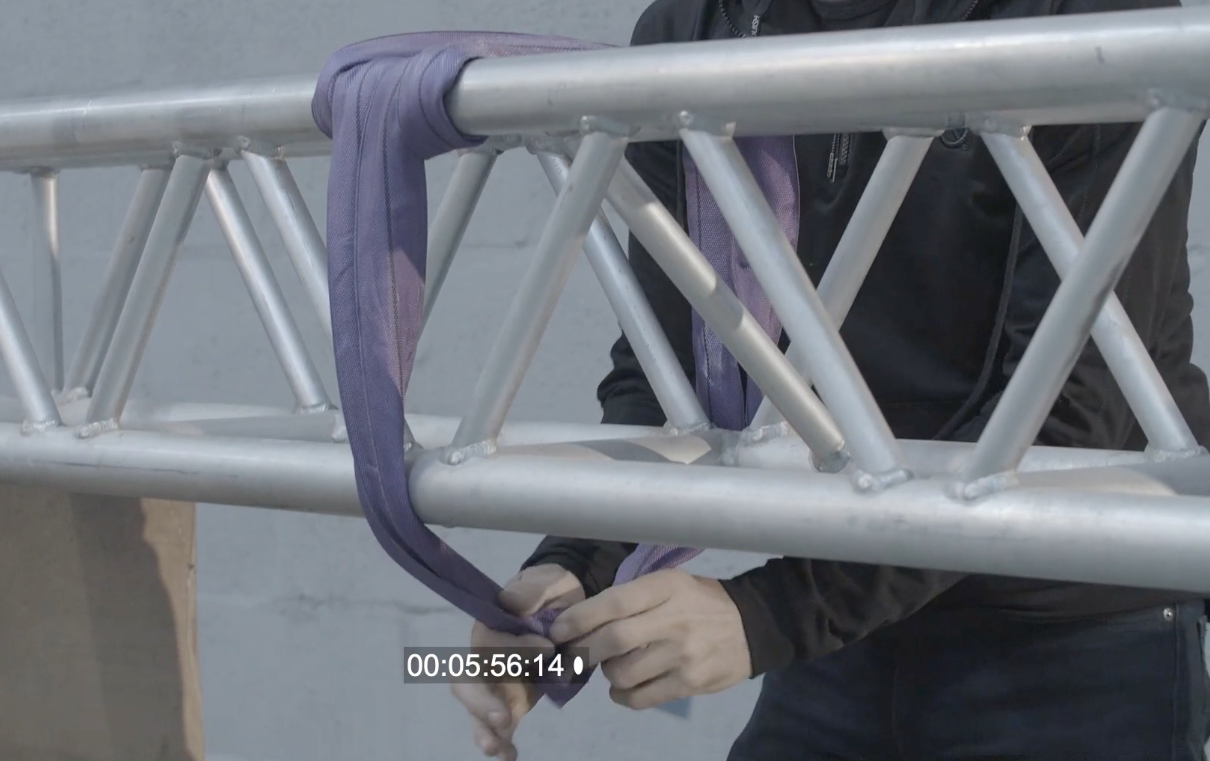
- Choking the sling around two chords - create a choke by laying the sling over the cords and then threading one end of the sling through the loop directly under the cords. You can do this on the top or bottom chords, but it doesn’t prevent the sling from sliding unless you incorporate a ‘wrap’ around at least one chord before you make the choke.
- Put the sling across the top cords then feed it through the braces in between the bottom cords then connect it– movement will be limited to between the two rungs.
Again, a ‘wrap’ right around one or both chords will provide a huge amount of grip.
· When using round slings to sling a beam, a truss, or even a hoop, keep the two parts running without crossing over themselves wherever possible. You’ll get more grip because there’s greater contact thus friction, between the sling and the object. It also prevents one part of the sling from biting into the other, potentially a weakness, especially under high loading.
· All reputable round sling brands have exhaustive user instructions which should be followed.
When the sling is over the top, and you’re connecting the two ends of the loop underneath, you’d use a bow shackle because the configuration creates a three-way load – the two sides of the sling plus what you are suspending underneath.
You can’t use the carabiner in the same way because it’s not designed for three-way loading. If a carabiner is all you’ve got, you can choke the sling by looping one end of the sling through the other and connecting the carabiner to the end, and that way it’s a two-way load, applying forces from above and below.
It’s important to be aware that the angle of the ‘Y-shaped’ part of the sling that hang below the truss increase the force applied. They don’t share the load unless below 30⁰. For example, if the Y meets at 30⁰, it can take double the WLL shown on the label. The wider the angle, the less load it can take.
Pulleys
Pulleys that were not designed to be used with karabiners or shackles need special consideration when rigging. Will the pulley sit in line with the line of force applied or is the rope causing the connector to twist or bend it?
Oval carabiners are generally better to use with pulleys whose side plates (cheeks) don’t in cross-section meet at a point.
The direction of load is important with pulleys so sometimes we are choking a sling around a truss and then using a single carabiner to ensure the pulley is facing the right direction. You must make sure the pulley is facing squarely in the right direction for the rope to pass smoothly through it or it will be running across the side plates of the pulley and causing damage to the rope.
In partnership with Articulation
Funded by Creative Scotland